What Is A Well Inspection Checklist?
A well inspection checklist is a list of the various well components and functions that need to be inspected to assess the overall condition of a well. A good well inspection checklist should take into consideration the type of well to be inspected. A well inspection includes checking all of the well components, water pressure flow rate, water level before and during pumping, pump motor performance, pressure tank performance, and well water quality.
Well inspectors measure the volume of water pumped and the rate at which the pump works. They take note of when the pressure tank is signaling the pump and when the pump doesn’t produce water as signaled. They also test for coliform bacteria and nitrates to ensure the potability of water or it’s safety for use.
What are the 3 Types Of Wells?
When inspecting wells, it’s important to first consider the type of well being inspected. Wells can be categorized into three main types.
1. Driven Wells
Though driven wells are built by driving steel pipes into sand, they should not be located in sandy areas with deep water tables. This is due to the presence of compacted soil which can hinder the performance of driven wells. Like dug wells, they use shallow groundwater as a water source.
2. Dug Wells
Dug wells are what most people imagine when thinking of wells due to their rich history. Though dug wells served as major sources of water for households in the past, at present most of them are not being used for water supply. One of the reasons for the declining popularity of dug wells is the preference for drilled wells, which will be discussed below.
3. Drilled Wells
Drilled wells are built by using rotary-drilling machines which break down bedrock. Sometimes pumps are used to obtain water more easily. In contrast to dug wells, drilled wells are modern and efficient. They also use deep groundwater as a water source, unlike the previous types of wells.
What Well is Right for Your Site?
When choosing what type of well to build, an important factor is the site’s location. As stated earlier, if the site is a sandy area but has deep water tables, building a driven well is not recommended. Another factor to consider is the well’s function on the site. For example, if the well water will be used for drinking, then a drilled well is best since it has the lowest risk of contamination. Though other factors may be involved in the final decision, you can get started by using the table below.
| Driven | Dug | Drilled | |
| Advantages | Cheap | Large diameter | Lower risk of contamination |
| Easy to construct | Can get water from sand, slit, clay | Can get water 1000 ft deep | |
| Disadvantages | Easily contaminated | Easily contaminated | Requires installation of casing and screen |
| Can only get shallow water | Possibly no water during droughts | Requires sealing of space around casing |
Top 3 Well Components to Check
While each component is essential for the well to function properly, three components are especially important in terms of safety. These are the well cover, the well casing, and the annular seal. The well cover is what sits on top of the well and keeps out vermin from entering the well. The well casing is what surrounds the well and keeps rock and soil from mixing with the well water. Like the well casing, the annular seal also lines the well and keeps out run-off surface water.
Well Cover
For a dug well:
- Is the well cover attached to the casing?
- Is the well cover vent screened and facing the ground?
- Is there nothing on top of the well cover?
For a drilled well:
- Is the well cover in good condition?
- Is the well cover pest-proof?
- Is the well cover sealed tight?
Well Casing
For a dug well:
- Remove the lid to inspect the inside of the well casing
- Check for damage or rust on the outside of the well casing
For a drilled well:
- Do not remove the lid to inspect the inside of the well casing
- Check for damage or rust on the outside of the well casing
Annular Seal
- Check if annular seal has shrunk or collapsed
- Fill gaps around annular seal with bentonite
Aside from those mentioned above, the other well components to check are the following:
- Capacitors
- Electrical wires
- Torque arrestors
- Pump pressure switch
- Check valves
- Pitless adapter
- Pipe fittings
Why Use A Well Inspection Checklist?
Well inspections can be tedious, so much so, that a well inspector might forget to check a major component or conduct an important test. Missing these inspection items can lead to the well malfunctioning. To avoid water well problems, use a well inspection checklist to keep track of everything.
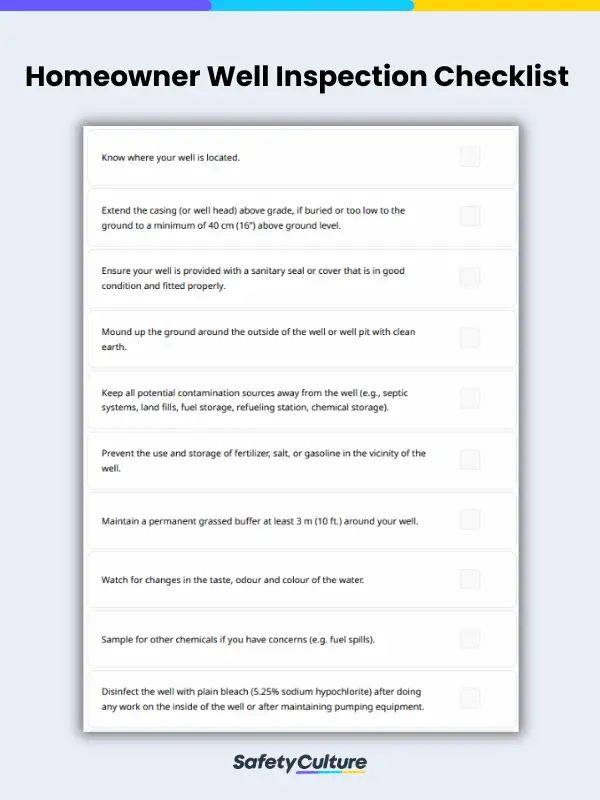
If a homeowner is planning on inspecting a well themselves, they should have a well inspection checklist to guide them through the inspection process. Since most residential well owners aren’t certified well inspectors, they need a well inspection checklist to ensure that their inspection is as comprehensive as possible.
How Do You Check A Well System?
Site managers or well inspectors can check a well system by conducting a well yield test to get an estimate of the water pressure flow rate. Below are the 8 steps of a well yield test:
- Turn on the water at a plumbing fixture.
- Measure the flow at the plumbing fixture.
- Check if the pump is running continuously at the water tank.
- Time how long the plumbing fixture is running water.
- Try running 150-300 gallons of water.
- If water runs, record number of gallons produced.
- If water pressure decreases, measure the flow again.
- If water did not run and water pressure did not decrease, compare the number of gallons against standard water volumes.
During regular well maintenance, a well inspector should check the well cover, the location of the well casing, the location of the well, the storage of hazardous materials on the property, and the seal of the abandoned well, if there is one. Contact a well inspector if there are problems with the well’s mechanisms or the water coming from the well. An annual water test is also recommended.
Well Inspection Checklist: Industry Use-cases
Industries with high water consumption include the automotive manufacturing, semiconductor manufacturing, textile industry, and beverage sectors.
A well inspection checklist is a must for a car manufacturer since multiple stages in the production process use water. In the automotive manufacturing industry, water is used for surface treatment and coating, paint spray booths, air conditioning systems, and boilers.
In the semiconductor manufacturing industry, 2000+ gallons of ultrapure water are needed for a single 8-inch wafer (or 100 chips). A semiconductor producer should have a well inspection checklist to ensure that water has been purified according to the specifications.
For the textile industry, the most water-intensive part is wet processing. The steps of wet processing are sizing, desizing, scouring, bleaching, dyeing, printing, and finishing. Since large amounts of water are required to remove excess chemicals between steps, a fashion company would benefit from an intuitive, digital well inspection checklist.
In the food and beverage industry, common beverage ingredients like sugar, barley, and coffee are made by using a lot of water. Each type of beverage has its own water requirements. For example, both a pint of beer and a glass of orange juice use 45 gallons while a glass of wine only needs 32 gallons. A beverage company can use a well inspection checklist to facilitate effective water management, which will, in turn, improve overall operations.


